Oh, first baking recipe at Brains & Beans! Cookie Cutter Cookies are easy and fun to make. They are kid friendly,meaning, not made of loads of sugar.
I love cute shapes, who doesn’t? I wanted to buy a cookie cutter for a very long time. It is not easy for me to buy things immediately. Impulsive is not in my dictionary. I ponder over the things I want to buy over months, researching for weeks, thinking about it almost everyday, staring at it for few days in online and then finally placing an order after mouthing, ‘screw this, I am going to buy it.’
Yes, sometimes I did find the products long gone before I make a decision. It’s a disappoint but that’s okay, I have never been an impulsive buyer because I know that I am either going to use it only once or realise their uselessness the moment it reaches me.
Besides, I do not have a million dollar. It is one of the reasons I sided with the minimalism theme with this blog, Brains & Beans. I have decided from the beginning that I am not going to splurge on utensils. I certainly cannot get my hands on wooden background but I was lucky enough to get my hands on that beautiful white surface, though. It indeed is a treasure. White backgrounds are posh and sophisticated for flat-lays.
Originally, I wanted to cut up fruits and vegetables (vegetables,not so much) in cute shapes with the cookie cutter that I bought. I stumbled upon pie crust, it piqued my interest and it seemed very easy to make. Moving past all the other things in my bucket list; sorry, puff pastry, I decided to try my hands at pie crust cookies. But not without a downside, flaky pie crust demanded a lot of butter. Until recently my place only sold salted butter. Although I prefer it on toasts, I am not a big fan.
I know what you are thinking.
yes, I tried making butter at home. It was a success! However I keep on forgetting about collecting the cream out of the milk everyday. If I can just make myself do it then I will roll in butter .
The reason for posting this 3Cs, Cookie cutter cookies is that it is very beginner friendly and you can engage your kids in baking. Give them the cutter and let them play with it! I am sure they will love it because if the kid in us wanted to make this then why wouldn’t a real kid be?
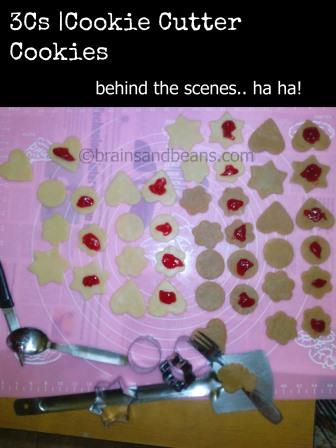
Although you can fill these cookies with Nutella, Chocolate spread, peanut butter, jam, so forth and so on. I would highly recommend you to freeze the fillings and dollop it. I tried using room temperature jam, they ooze out no matter how firmly you seal the pockets or how many holes you poke at the top of the cookies. They are going to come out anyway.
Another reason for freezing is to have something inside the cookie to bite on. It felt very hollow with the room temperature jam.
I am going to write both white flour and whole wheat flour recipe. There is not much difference. You can directly substitute the flours.
Cookies made of wheat flour are usually crumbly. Generally, I first try the authentic recipe with White flour and then make another batch with whole wheat flour. That way, I will get the confidence to bake further, otherwise Iwill be down and low if the first recipe was a disaster.
For instance, I am trying my hand at Apple oats-layer crisp. Though it is not a complete disaster, I am not ready to post the recipe. I need to do more tweaking before I introduce it to the world.
Sub-headers are just for clarity, don’t be intimidated.
♥ ♥ ♥ ♥ ♥ ♥ ♥ ♥ ♥ ♥ ♥ ♥ ♥
3Cs – Cookie Cutter Cookies
Author: Beans of BrainsANDbeans.com
Category: Cookies/Baking
Cuisine: International
Total Time: 20-35 minutes
Serves: 1 small batch
♥ ♥ ♥ ♥ ♥ ♥ ♥ ♥ ♥ ♥ ♥ ♥ ♥
Needed Equipment
- Cookie cutter shapes – Heart, Round, Star, Flower or any desired shape with 3 cm and 4 cm in diameter each. Sizes depends on how big of a cookie you want. 3 cm cutter earns small cookies. 4 cm cutter results in medium-sized cookies.
- Two big forks(optional but handy)
- A bowl
- Silicone mat or parchment paper or a mica sheet – to roll the dough
- Rolling pin
PREP
Freeze a cup of water at least 20 minutes before making the cookies. The water should be ice cold for this recipe.
INGREDIENTS
3Cs made of All purpose flour/Maida
1/2 Cup of All Purpose Flour/Maida
2 1/2 Tablespoon of salted butter
2 Tablespoon of ice cold water
For 3Cs made of Whole Wheat flour, simple replace the flour with same quantity.
DIRECTIONS
Baking method is same for both the flours, only the baking time varies
- Preheat the oven at 220C for 10 minutes.
- Measure out half a cup of All purpose flour or Maida in a bowl.
- Add two and a half tablespoons of butter to the flour.
- Hold the forks, one in each hand and begin to press(cut) the butter into the flour.
- Press well so the butter infuses with whole of the flour.
- Add water little by little to form a stiff dough
- Do not make the dough soggy.
- Wrap the dough in a cling film or place it in a bowl with loose lid
- Refrigerate (not freeze) the dough for thirty minutes
- After 30 minutes take out the dough, divide it into two. Roll each one by one.
- Roll the dough roughly about 0.2 cm in thickness
- Cut the shapes you want using the cookie cutter

Points to remember if you want to make jam filled cookies
- There are two part to one cookie. One cookie on the bottom, another on top.
- Two cookies must be the same shape. That’s how you can close the cookies together. you cannot press a star with a flower. you can only press a star with another star. I hope you are getting my point?
- Spoon a little jam on middle of the cookies, as shown in the above pic. Freeze them for a minute. Take them out and press another cookie on top of it.
- Press the fork around the edges of the cookie to seal them. This stops the jam from oozing out. In some cases, you cannot stop the jam from oozing but you do this step anyway.
- Poke holes with the fork on top of the cookies
- Also poke non-jam filled cookies
- Line the cookies on a baking sheet that is covered in parchment paper
BAKING
- After preheat time-out, place the cookie sheet on the middle rack/cookie rack
- Set the timer to 20 minutes
- Turn the cookie sheet around half way through the baking, approximately after 10 minutes.
- Temperature depends on the oven and voltage supplied to your house. I use a small OTG(Oven Toaster Grill) and we have voltage fluctuations, so it takes me 15-20 minutes to make it.
- I wanted browned cookies, so l let it sit more on the oven.
- Keep an eye out. Take the cookies out when you see the edges are browning or when you feel the baking is enough
- Transfer to a cooling rack. Wait until it is completely cool.
- Take one bite!
- Enjoy!
Author notes
- you can make the cookies sweet by adding a tablespoon of granulated sugar. Don’t be afraid if the chilled dough is sticky and stiff, it is the result of granulated sugar melting.
- Flour can be used to roll the dough
- Ice cold water is used to stop the butter from melting further
- Butter should be at room temperature. Pro tip: To quickly bring the butter to room temperature. Boil a cup of water. Pour it into a tall glass and pour back into the original cup. Now invert the hot empty tall glass over the butter(from fridge). Take the glass off after few minutes. The heat from the glass softens the butter. Ta-da!
- Ghee can be used instead of butter
- Parchment paper is important if you are making jam filled cookies. It is hard(but not impossible!) to clean the cookie sheet if the jam caramelies on it.
I cannot believe how many words I wrote on this recipe! It is the easiest cookie recipe out there. Sorry, if I was very detailed.
Check out my first ever Indian breakfast Dry Idli Upma, I am sure it will kindle your childhood memories.
I am new to food blogging, do point out mistakes gracefully in the comments below.
Thank you!
Follow me on Facebook, Twitter, Instagram and Pinterest for instant updates.
Clicking on the highlighted text directly lands you on my profiles.
you can now send this recipe directly to your friends via Whatsapp! Yay! Click on the Whatsapp icon below


